

The Foundation of a Perfect Finish: Skim Coat & Plastering Services Explained
Have you ever wondered why some walls look like flawless, flat canvases while others show every bump, crack, and imperfection when the light hits them? The secret lies in the skim coat. Skim coating and plastering are the essential "prep work" steps that happen before the final coat of paint. For HDB owners and condo residents in Singapore, these services are the difference between an amateur-looking paint job and a premium, high-end finish.
Skim Coating vs. Plastering: What’s the Difference?
While often used interchangeably, there is a technical distinction that homeowners should know:
Plastering: This is generally used for deeper repairs or creating a base surface. If you have a large hole, a crumbling section of wall, or need to level out a significantly uneven surface, you need traditional plastering. It is thicker and stronger.
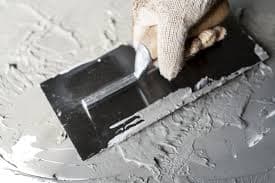
Skim Coating: This is the "final touch." It involves applying a very thin layer of fine finishing compound over a relatively smooth wall to create an ultra-smooth surface. It is the best solution for minor imperfections and for preparing a wall to take paint perfectly.
Why Skim Coating is Non-Negotiable
Over time, walls develop hairline cracks due to building settling, or they suffer from wear and tear. Simply painting over these issues will only highlight them. A skim coat involves applying a thin layer of finishing compound over the entire wall surface, creating a smooth, monolithic plane. This process hides repairs, evens out structural inconsistencies, and provides a uniform base for the paint to bond to, ensuring your walls look pristine and stay that way for years.
Signs Your Home Needs Skim Coat/Plastering
How do you know it’s time to call in the pros? Look for these common red flags in your home:
The "Resale" Look: Moving into a resale HDB or older condo? Previous paint layers often hide a multitude of sins. Skim coating is the fastest way to "reset" the room for a fresh paint color.
Hairline Cracks: If you see spider-web-like cracks across your walls, it’s a sign the surface is tired. Paint will not fix this; the surface needs to be reinforced.
Peeling & Flaking: If old paint is bubbling or flaking off, the underlying plaster is likely compromised or moist.
Uneven Light Reflections: Turn off the overhead lights and shine a torch at an angle across your wall. If you see shadows, bumps, or ridges, your wall is not flat.
The Long-Term Value: Why You Shouldn't DIY
Skim coating is often tempted as a DIY task, but it is notoriously difficult to get right. Achieving a perfectly flat wall requires an expert eye and a steady hand with a trowel. Common DIY mistakes—such as leaving "trowel marks" (ridges left by the metal tool) or failing to sand evenly—are incredibly difficult to fix once the paint is applied. A professional finish acts as a durable foundation; a good skim coat can last for years, whereas a poor DIY job often leads to peeling paint within months, costing you more in the long run to fix.
Pro Tips for Wall Preparation:
Prep the Surface: All dust, grease, and old wallpaper must be removed before skim coating to ensure the compound bonds properly.
Sand, Don't Skip: A perfect skim coat requires fine sanding between layers. Don't let your contractor skip this critical smoothing step.
Wait for Dry Time: Never rush the drying process. Painting over damp skim coat will lead to blistering, bubbling, and peeling paint later on.
Check for "Waves": Use a bright light held at a low angle against the wall to check for any uneven spots before finalizing the paint.
Professional Application: Skim coating is a skill that takes years to master. A professional trowel technique prevents unsightly lap marks and ridges.